Exploring AWS Cloudfront
5 months ago

Photo Credit to CodeToFun
PuTTY is a versatile and widely-used terminal emulator that facilitates secure remote connections to various systems. If you're navigating the Amazon Web Services (AWS) ecosystem, mastering PuTTY can make connecting to your EC2 instances a breeze.
In this tutorial, we'll explore the essential steps to make your PuTTY experience seamless when connecting to AWS EC2 instances.
Before diving into PuTTY mastery, ensure you have the following:
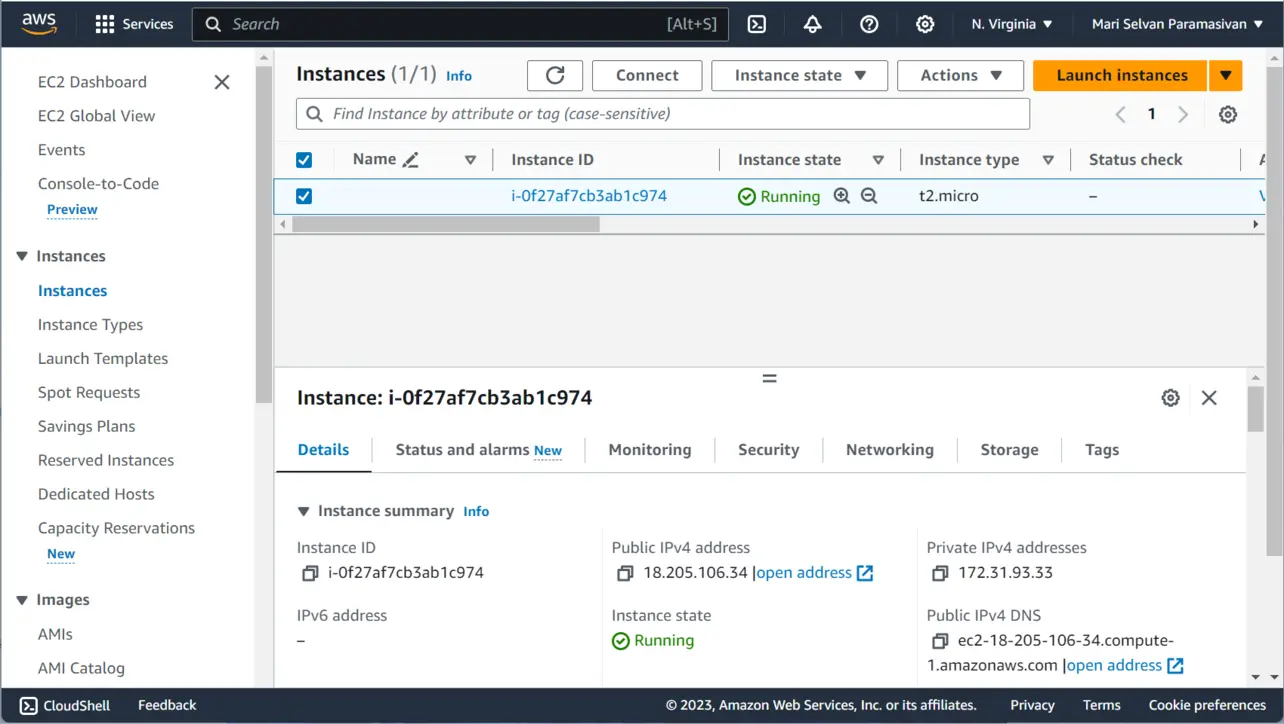
Before connecting with PuTTY, ensure your EC2 instance is up and running. Obtain your instance's public IP address, key pair (.ppk) file, and have the default login credentials. Typically as follows:
The following image shows that the Amazon Ubuntu EC2 instance is up and running.
Simply click on this download link to effortlessly install PuTTY and unlock efficient, secure file management on your system.
Follow the steps below to configure PuTTY for EC2 connection.
Launch PuTTY and enter the Host Name (or IP Address).
The host name is discoverable in step 8.

Photo Credit to CodeToFun
Navigate to "Connection," proceed to SSH, then access Auth, and finally, go to Credentials. From this point, locate and select your specific ppk file for the corresponding EC2 instance.

Photo Credit to CodeToFun
Proceed to the 'session' section, enter a name of your choosing into the input box labeled Saved sessions, and subsequently click on the save button.

Photo Credit to CodeToFun
Establish a connection to your EC2 instance by selecting the corresponding saved session name and subsequently clicking the open button.

Photo Credit to CodeToFun
The PuTTY terminal will now open; please select the accept button when the PuTTY security alert popup appears.

Photo Credit to CodeToFun
Login by giving the correct user name (go to step 7).

Photo Credit to CodeToFun
The User Name of your EC2 instance is depicted in the following image.
Follow these steps to find user name of your EC2 instance:

Photo Credit to CodeToFun
The Host Name of your EC2 instance is depicted in the following image.
Follow these steps to find user name of your EC2 instance:

Photo Credit to CodeToFun
Congratulations! You have successfully connected to your EC2 instance in PuTTY.
Mastering PuTTY for connecting to AWS EC2 instances empowers you with a secure and efficient way to manage your cloud infrastructure. By following these steps and exploring additional features, you'll streamline your remote server access and enhance your overall AWS experience.
Feel free to explore advanced PuTTY features and customize configurations based on your specific requirements. Happy connecting!

For over eight years, I worked as a full-stack web developer. Now, I have chosen my profession as a full-time blogger at codetofun.com.
Buy me a coffee to make codetofun.com free for everyone.
Buy me a Coffee


If you have any doubts regarding this article (PuTTY Mastery: Connecting to EC2 Instances Made Simple), please comment here. I will help you immediately.