PHP Star Pattern 3

Photo Credit to CodeToFun
PHP Star Pattern 3
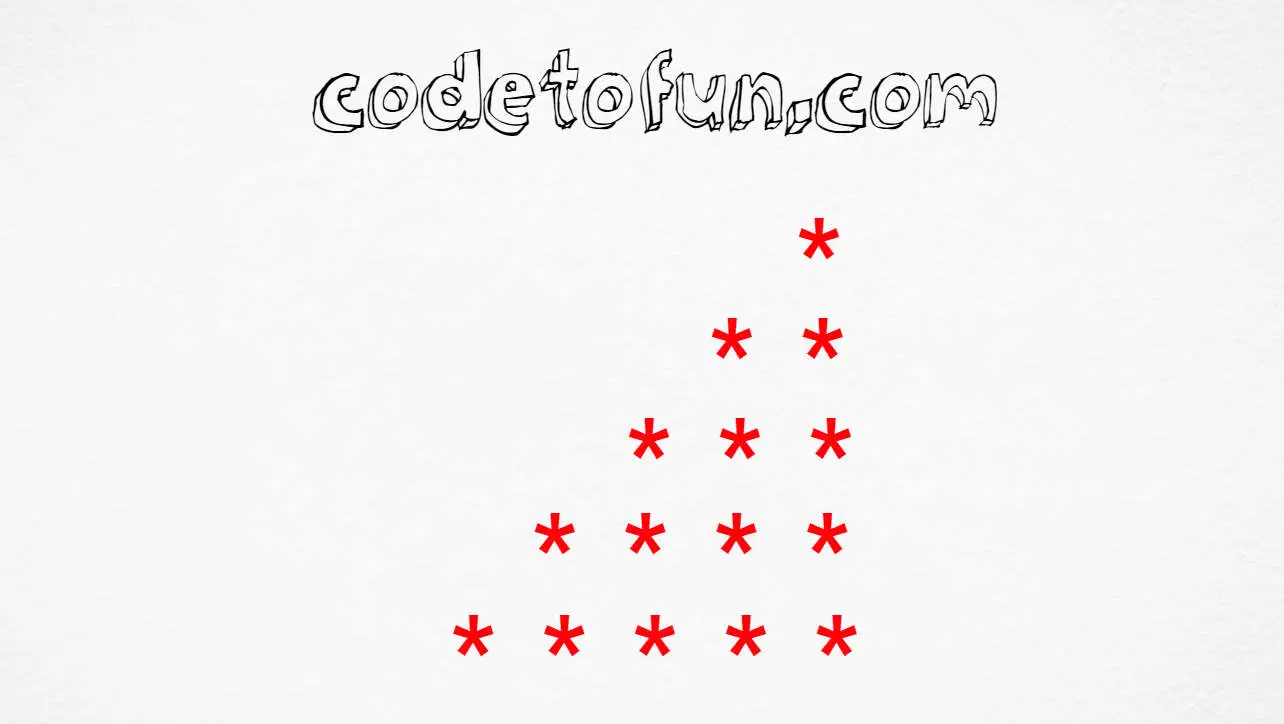
Here`s a program that prints the above star pattern using PHP Programming:
<?php
for($i=1; $i<=5; $i++)
{
for($j=5; $j>$i; $j--)
echo " ";
for($k=1; $k<=$i; $k++)
echo "*";
echo "<br>";
}
echo "<br>";
?>💻 Testing the Program
When you run the above program, it will print the following output:
    *
   **
  ***
 ****
*****
🧠 How the Program Works
Let's break down the logic behind the code:
- <?php and ?>: These tags indicate the beginning and end of PHP code blocks.
- for($i=1; $i<=5; $i++): This is the outer loop that iterates from 1 to 5. It controls the number of rows in the pattern.
- Nested Loop 1 (for($j=5; $j>$i; $j--)): This loop is responsible for printing spaces before the asterisks to create the right-aligned triangle. It iterates from 5 to 1, decreasing by one in each iteration.
- echo " ": This line prints two non-breaking spaces (HTML entity ), effectively creating the space between the asterisks and the right edge of the pattern.
- Nested Loop 2 (for($k=1; $k<=$i; $k++)): This loop is responsible for printing the asterisks in each row. It iterates from 1 to the current value of $i, which represents the current row number.
- echo "*";: This line prints an asterisk for each iteration of the loop.
- echo "<br>";: This line prints a line break (<br>) after each row, creating a new line in the pattern.
- The outer loop continues to iterate, and with each iteration, the number of spaces decreases and the number of asterisks increases, creating the right-aligned triangle pattern.
- After the outer loop completes, echo "<br>"; is used to create a blank line between the pattern and the rest of the page content.
- ?>: This tag indicates the end of the PHP code.
💯 Tips for Enhancement:
Explore the versatility of this pattern by adjusting its parameters. Whether you increase or decrease the size, tweak the spacing, or modify the characters used, each change opens up a world of possibilities, allowing you to customize and create your unique visual effects.
✔ Conclusion:
Creating visually appealing patterns is not only a fun endeavour but also a great way to enhance your programming or design skills. We hope this tutorial has inspired you to explore the world of creative coding. Share your creations with us, and let your imagination run wild!
🤗 Closing Call-to-Action:
We'd love to see your unique interpretations of the star pattern. Share your creations in the comments below, and don't hesitate to reach out if you have any questions or suggestions for future tutorials. Happy coding!
👨💻 Join our Community:
Author

For over eight years, I worked as a full-stack web developer. Now, I have chosen my profession as a full-time blogger at codetofun.com.
Buy me a coffee to make codetofun.com free for everyone.
Buy me a CoffeeShare Your Findings to All
Recent Post in PHP


If you have any doubts regarding this article (PHP Star Pattern 3) please comment here. I will help you immediately.