Add a WordPress Website to Google Search Console
What You’ll Learn
How to add your WordPress website as a property in Google Search Console (GSC) and verify ownership using the recommended HTML file upload method.
You’ll learn what GSC is, why every WordPress owner should use it, the five verification options, and a clean step-by-step flow that uses FileZilla to upload the verification file to the WordPress root directory.
🧐 What is Google Search Console?
A web tool from Google that lets webmasters see how their site is indexed, monitor search traffic, fix coverage problems, and submit sitemaps. It is the single source of truth for how your WordPress site looks to Googlebot.
📊 Why Use Google Search Console?
GSC is the official Google tool for tracking how your WordPress site performs in Search. Top 10 reasons to set it up today:
Track total organic clicks, impressions, and average position for your site.
Detect coverage issues such as Redirect error, Server error (5xx), and Not found (404).
Monitor submitted sitemaps and any indexing problems Googlebot encounters.
Check the index status of any specific URL on your site.
Send re-indexing requests for new and recently updated posts.
See exactly which search queries your site appears for in Google.
Troubleshoot mobile usability, AMP, and other Search-related issues.
Get Core Web Vitals data based on real-world Chrome users.
Validate rich results (structured data) crawled by Google.
Discover the external sites that link to you.
🔑 The 5 Verification Methods
Google Search Console accepts any one of five ownership-verification methods. Here is how they compare for a WordPress site:
Upload a small .html file Google generates to the WordPress root via FileZilla.
Paste a <meta> tag inside the homepage <head> using a theme or SEO plugin.
Already running GA4? Use the same Google account — verification is one click.
Have a GTM container on the same Google account? GSC can verify via the container ID.
Add a TXT record at your domain registrar. Required for the Domain property type.
Recommendation: Use the HTML file upload method — it is the most reliable for WordPress on shared hosting, VPS, or cloud (EC2/Bitnami) and does not depend on any plugin or third-party tool.
Add Your WordPress Site as a Property
Sign in to Google Search Console with your Gmail account. Pick the URL prefix method and paste your full WordPress URL (including the protocol).
Example property URL:
https://yourdomain.com/Click Continue. Search Console will then show you all five verification methods—keep the HTML file option selected and download the file.
🧠 How It Works — Step by Step
Sign in to Search Console
Open search.google.com/search-console and sign in with the Gmail account you want to associate with the property.
Add property (URL prefix)
Choose the URL prefix method, enter your full WordPress URL (e.g. https://yourdomain.com/), and click Continue.
Download the HTML file
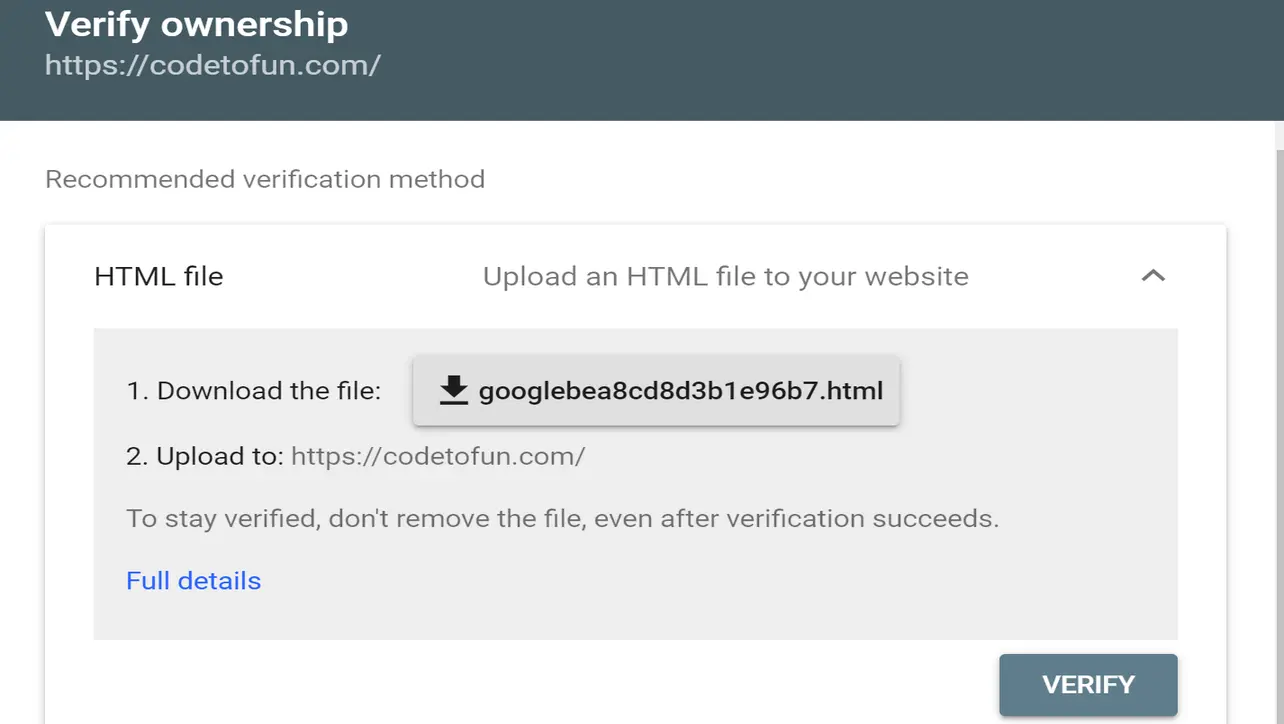
Pick the HTML file verification option (recommended) and download the small googleXXXX.html file Google generates for your property.
Upload via FileZilla & click Verify
Connect with FileZilla, browse to the WordPress root (e.g. /opt/bitnami/wordpress), upload the file, then click Verify in Search Console.
WordPress site is verified
Google confirms ownership and unlocks the full Search Console dashboard—impressions, clicks, indexing, sitemaps, and Core Web Vitals data start flowing in over the next 24–48 hours.
Upload the HTML File & Verify Ownership
Use FileZilla (or any SFTP client) to connect to your WordPress server. Change the Remote location to your WordPress root and drag the downloaded HTML file across.
/opt/bitnami/wordpress/googleXXXXXXXXXXXXXXXX.htmlOnce the upload finishes, return to Search Console and click Verify. You should see a confirmation that ownership has been verified.
⏱️ What Happens After Verification?
Verification only takes a few seconds, but the SEO data flows in over time. Here is the realistic timeline of what you will see in Search Console:
✅ Ownership confirmed
GSC dashboard unlocks. The Overview, Performance, and Pages tabs become available, even if they are empty for now.
🔎 Indexing starts
Submit your sitemap.xml. Googlebot begins crawling and the first impressions trickle into Performance.
📋 Queries & clicks
Real search queries and click data appear. Coverage report flags any 4xx/5xx pages and indexing issues to fix.
🔥 Full data + CWV
28 days of historic data populates. Core Web Vitals, mobile usability, and rich-result reports light up with real-world signals.
💡 Tips for a Successful Setup
Do This
- Add the HTTPS version of your site as the property (matches your live URL)
- Submit your sitemap.xml immediately after verification
- Keep the
googleXXXX.htmlfile on the server permanently - Add both www and non-www properties if both resolve
- Check Coverage and Performance reports weekly
Avoid
- Deleting the verification HTML file (Google rechecks periodically)
- Using the wrong protocol (HTTP vs HTTPS) when adding the property
- Uploading the file outside the WordPress root (e.g. inside
/wp-content) - Ignoring coverage errors and mobile-usability warnings
- Forgetting to grant access to teammates from Settings » Users and permissions
Key Takeaways
Google Search Console is a free tool for monitoring how your WordPress site performs in Google Search.
Use the URL prefix method and the HTML file upload to verify ownership.
Upload the verification file to the WordPress root (e.g. /opt/bitnami/wordpress) using FileZilla.
After verifying, submit your sitemap and start tracking clicks, impressions, and indexing.
❓ Frequently Asked Questions
/opt/bitnami/wordpress on a Bitnami EC2 instance) using FileZilla, then click Verify.Boost Your WordPress SEO Today!
Once Search Console is verified, submit your sitemap, fix coverage issues, and watch your impressions grow week over week.
Google Search Console is one of the best tools for ensuring the success of your SEO campaign because it lets you see your site through Googlebot’s eyes. The Performance report alone reveals every query you rank for—data you simply cannot get from WordPress admin or any analytics tool.
About the author


12 people found this page helpful