An AWS security group is a virtual firewall for your EC2 instance (and for other network interfaces). Think of it as a door list for network traffic.
You write rules that say what is allowed in or out:
Inbound — who can start a connection to your instance (SSH, HTTP, HTTPS…).
Outbound — where your instance may start connections (often “all” by default).
Deny by default (inbound) — if a port is not listed, outsiders cannot open it.
Beginner tip.
Security groups have no extra fee. Wrong rules are the #1 reason a new website on EC2 “won’t load.”
Why it matters
In Simple Words
What problem does it solve?
An instance on the internet can receive traffic from anyone. Security groups let you allow only the ports you need—for example SSH for you, HTTP for visitors—and block the rest.
Is a security group the same as a password?
No. Keys and passwords prove who you are after the connection starts. A security group decides whether the connection is allowed to reach the instance at all.
A short list of ports you need (SSH 22, HTTP 80, HTTPS 443, or your app port such as 3000).
Follow along
Step-by-Step
Four small steps: create a group, add beginner rules, attach it, then verify.
Step 1 — Create a Security Group
Give yourself a named door list instead of relying only on the VPC default.
Open the AWS console → EC2.
Under Network & Security, choose Security Groups.
Choose Create security group.
Set a clear name (for example web-demo-sg) and description.
Select the same VPC as your instance.
How It Works
A security group lives in one VPC—it cannot span Regions or unrelated VPCs.
Empty inbound rules mean no public connections until you add them.
You can attach the same group to many instances that share the same door policy.
Step 2 — Add Beginner Inbound Rules
Typical first website on a single EC2 instance:
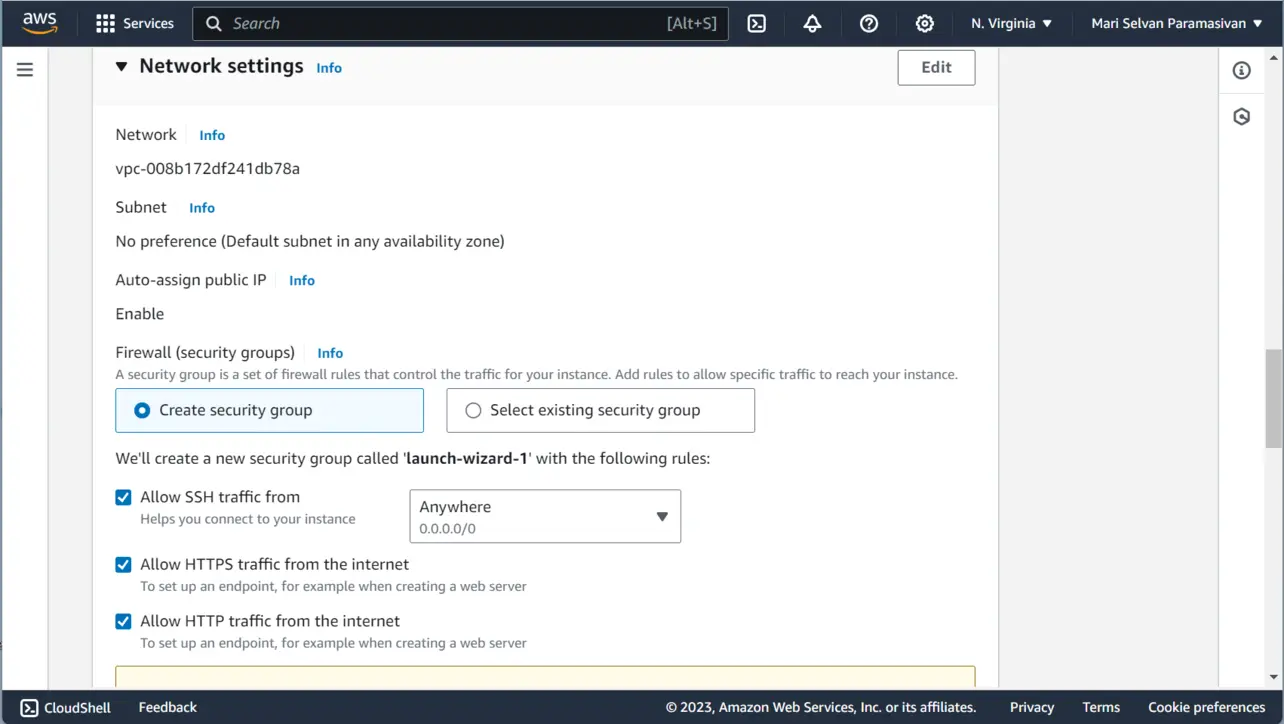
SSH — TCP 22, source My IP (preferred) or a known CIDR.
HTTP — TCP 80, source 0.0.0.0/0 if the site must be public.
HTTPS — TCP 443, source 0.0.0.0/0 when you serve TLS on the instance.
If your app listens on 3000 without Nginx, open TCP 3000 instead of (or until you add) 80.
Amazon EC2
How It Works
Each rule is an allow—security groups do not have “deny this IP” lines the way some firewalls do.
Source can be another security group—perfect for ALB → EC2 (allow the ALB’s group, not the whole internet, on the app port).
Outbound defaults usually allow all; tighten later if your policy requires it.
Least privilege for SSH.
Tutorials often open SSH to everywhere. Switch SSH to My IP as soon as you can.
Step 3 — Attach the Group to Your Instance
Rules only help if the instance uses this group.
Open Instances, select your instance.
Choose Actions → Security → Change security groups (wording can vary slightly).
Add web-demo-sg (and remove groups you do not want).
Save. Changes apply without relaunching the instance.
How It Works
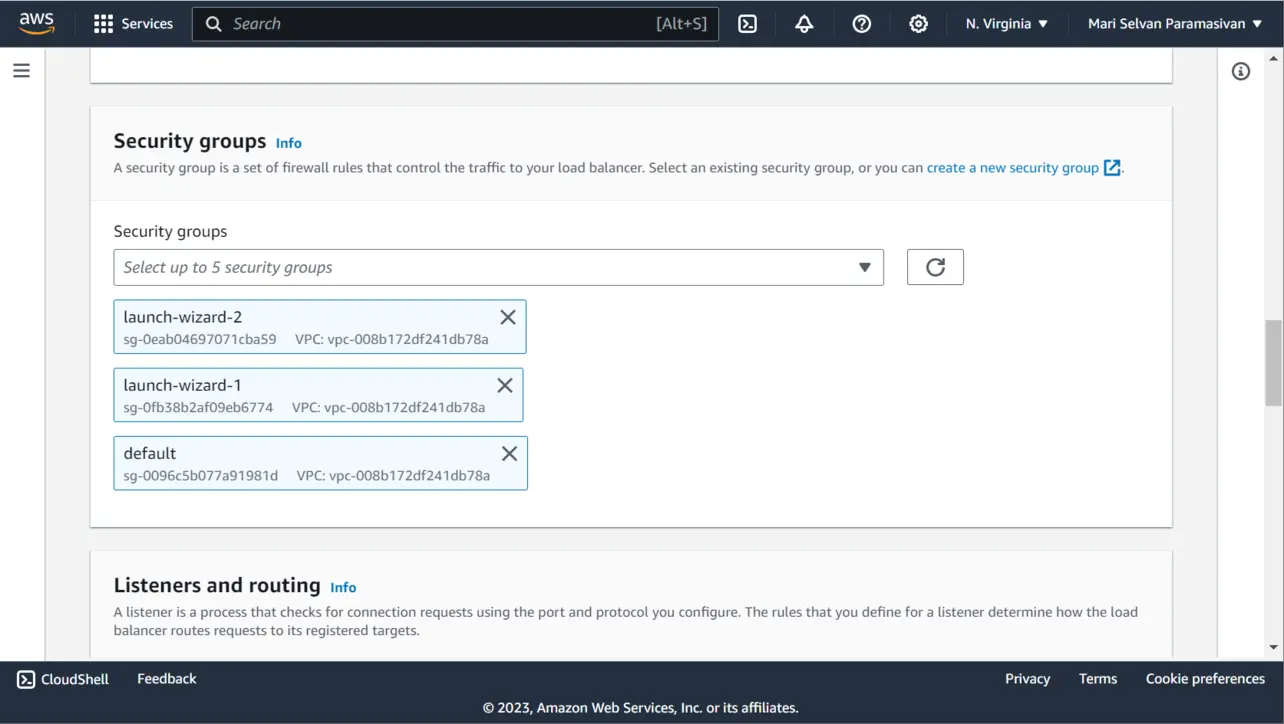
An instance can have multiple security groups—AWS evaluates the combined allows.
Editing rules later updates every attached instance automatically.
Launch wizard can create or select a group up front—same idea as attaching afterward.
Step 4 — Verify SSH and HTTP
SSH with PuTTY or OpenSSH using your key and the public IP / Elastic IP.
If a web app or Nginx listens on 80, open http://YOUR_IP/ in a browser.
If SSH works but HTTP fails, confirm the process is listening and that TCP 80 (or 3000) is in the inbound rules.
Behind an ALB: open 80/443 on the ALB group; on the instance, allow the ALB security group on the target port.
Elastic Load Balancing
How It Works
Two doors for ALB setups—client → ALB, then ALB → instance.
Timeouts often mean a closed port; connection refused often means nothing is listening.
After Nginx owns 80, you can close public access to the app’s high port.
Avoid these
Common Beginner Mistakes
App runs, browser times out
Node is fine; inbound HTTP/HTTPS (or 3000) is missing. Open the matching port.
Wrong port for the app
Security group allows 80 but the process listens on 3000 (or the reverse).
SSH open to the world forever
Use My IP for TCP 22 when you are done with the first demo.
Only opening the instance for an ALB site
Clients hit the ALB first. The ALB security group needs 80/443 too.
Allowing 0.0.0.0/0 to targets behind an ALB
Prefer source = the ALB security group on the app/health-check port.
Editing the wrong Region’s group
Security groups are Regional. Check the console Region matches the instance.
Remember
Key Takeaways
Security groups are allow-lists for inbound (and outbound) traffic.
They are stateful—replies to allowed connections are tracked automatically.
Match ports to the app (22 / 80 / 443 / 3000) and tighten SSH sources.
ALB setups need two layers of rules: clients→ALB and ALB→targets.
One line: open only the ports you need, prefer My IP for SSH, and remember the ALB door if you use a load balancer.
Frequently Asked Questions
A security group is a virtual firewall for EC2 instances (and other ENIs) that allows traffic you list in inbound and outbound rules; everything else is denied by default for inbound traffic.
Yes. There is no extra charge for using security groups. You still pay for the resources they protect, such as EC2 instances.
If an inbound connection is allowed, the reply traffic is allowed out automatically. If your instance starts an outbound connection that is allowed, the reply can come back in without a matching inbound rule.
Only for quick demos. Prefer My IP (or a known office CIDR) for SSH. Opening SSH to the whole internet makes password or key guessing attacks more likely.
Yes. The ALB needs inbound rules for client ports (often 80/443). Targets need inbound rules that allow traffic from the ALB security group on the app and health-check ports.
Yes. You can edit rules anytime, and you can change which security groups are attached to a running instance. New rules apply to associated instances automatically.